This is the time that you will start to see the vision of your quilt top come into fruition! It doesn't matter if you have all the same block, different blocks or some of the blocks. It's your top, the way you want it!
RULE #1. MEASURE, THEN MEASURE AGAIN. I cannot stress this enough. Once you cut your block, you cannot go back, so of course we want to make sure our cuts are accurate.
The first thing we are going to do is learn to square up our blocks....yes, that again. Squaring up is the use of a square ruler on units, blocks or quilt tops to assure a right angle in all the corners.
Fabric has give and no matter how careful you are at each step in the construction of your block or your quilt, things may be out of square as you move along in the process. If you square up as you go, then you'll have a more successful outcome.
A 15.5" block that really is 15.5" and not 14.5" or 15.75" means that your quilt top will be flat. Your sashing or borders will fit as they should. The corners on the quilt will be square. There will be no nonsense about "quilting it out" when you find a bubble. Why spend a lot of time working around your mistakes when you can do it right in the first place?

You can get a square up ruler like the one shown which is a 16" ruler by Quilt in a Day, which will run you somewhere around $20. they also make larger sizes that are, of course, a little more expensive. They are a nice addition to your quilt tools. There are many brands to choose from, this is only one example. Shop around online for the best deals, watch Joann's for your 50% off one item and use that to purchase for great savings!
Measure all of your blocks and find the smallest one. We are going to square up your smallest block first and then square up to that measure all of your other blocks. Square your block up the same way that you squared up your individual units. Refer back to the video in lesson one: The Friendship Star Block
Once you have your blocks squared up you can start laying them out to see the order in which you would like to see them in your completed quilt. Stand back, enjoy the view...it helps to take a photo to get perspective.

Once all of your blocks are squared up we will start to audition our sashing. A great way to do this is to lay out your potential sashing fabric (before you cut it) and lay your blocks right on top. If you like it, make your cuts. You can do this right at the fabric store, just lay your fabric selection out on the counter and audition your blocks. You may want to refer to your lesson on color before you do this. Think about what effect you are looking for. Sometimes a pop of color from the other end of the spectrum can be very exciting, sometimes you may want to have a more monochromatic (all the same color) effect and you will look for differences in "values" (light and dark) to give you the desired pop. Just play with it until you like what you see. You can audition several fabrics at once by laying them out next to each other and placing your blocks on top.

Here are a couple links that you will find valuable in completing your sashing.
I am going to suggest for this project, that you cut your sashing 2 1/2 inches wide and I am going to suggest for a first time quilter, that you stay away from "setting squares". I would just work with straight pieces. You will piece 3 "rows" with short strips of sashing. Once completed, you will need to piece your 3 "rows" together using a long strip of sashing that you will need to piece as it will be wider than the width of the fabric. The link below will show you how to do that. Center your sashing "seam" in the center of your middle block so that it will not be so obvious.
Piecing Strips (http://www.mccallsquilting.com/mccallsquilting/articles/piecing_sashing_border_binding_strips)
For the first border on the outside of your quilt, I will suggest that you stay with the 2 1/2 inch strip. Piece several together and you won't have to stop and make more. I think mine took 5 strips.
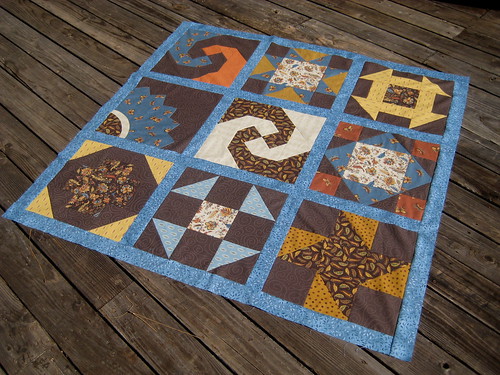
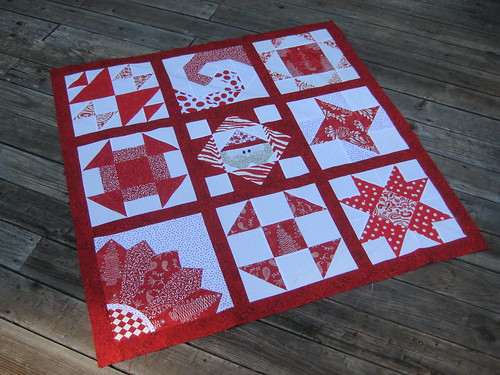
When you are finished, it should look like this:
For our next class, I am thinking about perhaps having a catch up day, so everyone can get up to speed. Drop me an e-mail and let me know how you feel about that. I would like everyone to have their top completed before we move onto quilting.
No comments:
Post a Comment